Wednesday, December 5, 2018

Serendipity Stamps December Blog Hop #1!


Happy Holidays Everyone!!

 I don’t know about you, but I’m having lots of fun making Christmas cards! It’s this time of the year that I start to regret not beginning this process a little earlier (like maybe in July? LOL) but I’ve still managed to make quite a few.

I have one of those to share with you today, but first let me remind you that today is the beginning of Serendipity Stamp’s first December  BLOG HOP!!

Serendipity showcases a new set of stamps every two weeks. Just comment on the Design Team’s blogs listed below to enter to win a $20 gift certificate to Serendipity Stamps! Also please note that the stamp and die of the month are Penguins and the Snow Birds Branch Die Set, respectively…both are half off for the month of November!

Here’s a list of all the designers participating in the blog hop today…


I used one of my favorite Serendipity Stamp’s sets for today’s card…it’s called the For Unto Us cling stamp set and it includes a manger scene and five gorgeous sentiments! For this card I used the ‘Joy to the World’ sentiment.


I stamped the sentiment onto Ivory cardstock and embossed it using clear embossing ink. I die cut this with a circle die and then die cut a larger circle from red cardstock for a frame. I popped my sentiment circle up using a circle cut from craft foam.


I made my background panel from two pieces of Carta Bella’s “Christmas Delivery” collection placed at a diagonal. I added some green and ivory plaid ribbon, an ivory paper rose, and some die cut spruce stems. As a final touch I added some red enamel dots for “berries” (yes, I know that Spruce don’t produce berries, but I thought it looked pretty anyway!) I also added a few extra enamel dots around my sentiment. I popped up my patterned paper layers using craft foam.

tttddde


For the inside of my card, I used another of the sentiments from the “For Unto Us” stamp set. I LOVE this font! So pretty!


Thanks so much for visiting with me today! I hope you all have a fantastic day and find some time during this busy holiday season to play! Happy crafting!!


Wednesday, November 21, 2018

Serendipity Stamps November Blog Hop #2!


Hi there fellow crafters! I hope you are all having a wonderful week leading up to the Thanksgiving holiday! It’s such a fun time of the year!

I’ve been busy making all sorts of holiday cards and have a quick and easy one for you today, but I first want to remind you that today is the first day of Serendipity Stamp’s second November BLOG HOP!!

Serendipity showcases a new set of stamps every two weeks. Just comment on the Design Team’s blogs listed below to enter to win a $20 gift certificate to Serendipity Stamps! Also please note that the stamp and die of the month are Covered Bridge and Sympathy, respectively…both are half off for the month of November!

I also wanted to let you know that Serendipity Stamps is discontinuing many of their wood mounted stamps so they are having a SALE! Be sure to check the Bargain Basement for over 150 items!

Here’s a list of all the designers participating in the blog hop today…


I can’t wait to share this card with you today because it is super easy but it looks like you spent a lot of time making it! I used Serendipity Stamp’s Merry Christmas and a Happy New Year for my sentiment…


To create this card, I started with a 4.25” x 11” red cardstock piece and and scored it using my Scor-Buddy at 2” and 5.5”. I then cut a 4.25” x 5.5” rectangle from some gorgeous Alexandra Renke Christmas patterned paper (using a rectangle die) and trimmed it into two pieces (one at 2” x 4.25” and one at 5.5” x 4.25”). I adhered these to the top and bottom of my card, making sure that the patterns lined up.


Next, I stamped my sentiment using Distress Oxide Ink in Bundled Sage. I embossed this using clear embossing powder. I die cut this using a circle die and added a scalloped frame from red cardstock around my sentiment.


I added this to the front of my card, leaving half of the circle hanging over the front flap as a tab.


I finished the inside of my card using more Renke paper, and as a final touch I added a Tim Holtz snowflake charm with a bit of jute twine and a white Nuvo drop. 

 See what I mean? Simple but gorgeous…and just think how many different combinations you can make using different patterned papers and different colored inks. This sentiment would look gorgeous in any color!

That’s it for today…as always, thank you so much for visiting my blog today. I am thankful for each and every one of you! Happy Thanksgiving!!


Wednesday, November 7, 2018

Serendipity Stamps November Blog Hop #1!


Hello everyone and Happy November!

 I’ve just started making my Christmas cards…pretty late for a paper crafter, right?  I was away on a fabulous trip to Thailand with my husband to celebrate our 25th anniversary and was too busy to even color anything, even though I took lots of images and Copic markers on the trip with us! Even though the trip was amazing,  I’m happy to be home and creating again…I really missed it!


So…the great news is that today is the first day of the Serendipity Stamps November Blog Hop 1!!


Serendipity showcases a new set of stamps every two weeks. Just comment on the Design Team’s blogs listed below to enter to win a $20 gift certificate to Serendipity Stamps! Also…please note that the stamp and die of the month are Covered Bridge and Merry Christmas, respectively…both are half off for the month of November!

Here’s a list of all the designers participating in the blog hop today…


For today’s card I used the adorable One Jingle Bell stamp.


 I created my own background paper by stamping the bell multiple times onto Neenah 100lb Solar White cardstock and coloring using Copic markers. I used the following colors:


W1, W3, W5, W7, YR21, YR23, R46, R39, G24, YG97, YG99


The warm greys were used to color the “metal” part of the bell, and then I added touches of YR21 and YR23 to give it a tarnished look. 


I die-cut my paper into a stitched 4.25” x 5.5” rectangle and adhered this onto a black A2 sized card. I then added some glossy accents to the berries and a beautiful red ribbon down the left side.


For my sentiment, I die-cut the Joy Die three times from red cardstock and layered these on top of one another using liquid glue. This created a sentiment with more dimension and interest than just die-cutting the sentiment once.


I used the Joy to the World stamp for the inside panel of my card, stamping it using a lobster-colored ink that matched my red ribbon. 


 And there you have it…a clean and simple card for the holidays using only a few supplies! Thank you all for visiting with me today!


Wednesday, September 19, 2018

Serendipity Stamps September Blog Hop #2!


Hi everyone! I hope you are all doing well and having fun creating those fall cards! Halloween is one of my favorite holidays so I’ve been having lots of fun creating cards for family and friends. I have a fun Halloween card for you today, but first I wanted to let you know that today is the first day of the Serendipity Stamps September Blog Hop #2!

Serendipity showcases a new set of stamps every two weeks. Just comment on the Design Team’s blogs listed below to enter to win a $20 gift certificate to Serendipity Stamps! Also please note that the stamp and die of the month are Pumpkins on a Fence and Creepy Wreath, respectively…both are half off for the month of September!

Here’s a list of all the designers participating in the blog hop today…


In other great news…Serendipity Stamps will be holding a SALE along with this week’s blog hop! Buy three items and the fourth one is free!


Today’s card features the die of the month...Creepy Wreath…this is a fabulous die that can be used to create a Halloween wreath, but it could also be used to create Christmas wreaths or any other kind of wreath!


I first created my background by inking Distress Inks in Dusty Concord and Seedless Preserves onto a panel of Bristol Smooth cardstock using my ink blending tool. I then die cut the Creepy Wreath twice, once from black cardstock and once from Bristol Smooth cardstock. I inked the Bristol Smooth one using the same Distress Inks.


I used a scalloped rectangle die to cut my inked panel and then layered this onto black cardstock. Once this was finished, I layered my two wreath dies together and adhered them to a small circle frame cut from black cardstock. This was then mounted onto my inked panel using foam tape to pop it up from the background.


I decorated my creepy wreath using the adorable owl from the Halloween Pops Cling Set and the extra dies included in the Creepy Wreath die set. I colored the owl using YG17, YG23, YG03, V17 V15, V12, and Y06. I used glitter papers for the ghosts and skull, and then added lots of sequins in spooky colors to bling it up a bit!


For my sentiment, I used the Creepy stamp. I stamped the image, colored it in ombre fashion using Copic markers in YG17, YG23, and YG03. I added a bit of grey with T0 and T1 on the spider webs. I then fussy cut this out and added it to the front of my card.


To complete the front of this card, I mounted my panel onto an A2 sized lime green glittery cardstock and then mounted the entire thing onto a black A2 sized card.


For the inside of my card, I stamped the Witching You sentiment and colored the pumpkin in with Copics in V15, V12, and Y6. I adhered an inked strip from my previous Distress Ink blending to the bottom of the panel and mounted this with more black and lime green glitter cardstock.


That’s all the spookiness for today! As always, thank you for visiting and have a spook-tacular week!!

Wednesday, September 5, 2018

Serendipity Stamps September Blog Hop #1!


Hello Everyone! Happy September!! There’s a nip in the air…time to start making those Fall cards!

And guess what? It’s time for Serendipity Stamp’s first Blog Hop of September! Serendipity showcases a new set of stamps every two weeks. Just comment on the Design Team’s blogs listed below to enter to win a $20 gift certificate to Serendipity Stamps! Also please note that the stamp and die of the month are Pumpkins on a Fence and the Boo die, respectively…both are half off for the month of August!

Here’s a list of all the designers participating in the blog hop today…


My card for today is a Halloween one and features the beautiful Pumpkin Die


I die cut the pumpkin  from black mirror cardstock and placed an orange cardstock behind it. I love this die because it looks wonderful in black and orange for Halloween, but would be equally beautiful cut in harvest colors for a Fall or Thanksgiving card.

I layered several different pieces of cardstock to create a background for my card and then added a piece of black Dresden trim from my stash. I then die cut the Boo Die from the same black mirror cardstock and adhered this to my card using some black foam cut from the same die for dimension. I adhered this panel to another piece of black mirror cardstock so that I had a black border around my card.


As a final touch I added some jute twine and enamel drops.

For the inside of my card, I stamped the Happy Halloween Arc using Memento’s Black Tuxedo Ink and added a cute little black cat from the Creepy Wreath die.


I hope you all have a fantastic week! Thanks so much for visiting my blog today!


Wednesday, August 15, 2018

Serendipity Stamps August Blog Hop #2!!

It’s Serendipity Stamp's Blog Hop time everyone!! Serendipity showcases a new set of stamps every two weeks. Just comment on the Design Team’s blogs listed below to enter to win a $20 gift certificate to Serendipity Stamps! Also please note that the stamp and die of the month are Acorns and Sweetgum and Sympathy, respectively…both are half off for the month of August!
Here’s a list of all the designers participating in the blog hop today…
 For today’s card I decided to create a Fall card using Serendipity’s Leaves Reverse Die and the All Those Golden sentiment.


I first created a background for my card using Distress Oxide Inks in the following Fall colors…


I blended them onto Bristol Smooth paper using my ink blending tool.


I sprinkled water onto my background and dried it with my heat tool, added more bands of color, and added more water. I didn’t blot the ink up with a paper towel in this case…I simply added the water and dried it with my heat tool.
This was the result…


I love how these inks oxidize and change colors when water is added!
I then used a stitched rectangle die to cut out an A2 sized panel to create the front of my card.

 Next, I  stamped All Those Golden onto cream colored cardstock and cut it out using a tag die. I mounted the tag onto my background using foam tape. I made a small bow from green burlap twine and added that with a button to the tag.
Next, I made another background using the same Distress Oxide Inks and cut out some leaves using the Leaves Reverse Die. I added these to the background and tag, popping some up with foam tape for dimension. I also tucked some of the smaller leaves under the twine.
 I added some sequins and tiny beads to the background and tag to finish off the front of my card and adhered this to an A2 sized cream card.


 For the inside of my card, I glued a strip from my leftover Distress Oxide background onto cream cardstock and cut these out using a smaller stitched rectangle die.  I mounted this onto an olive green mat. I then added one of my leftover leaves as a final touch.


I hope you enjoyed my Fall card today and are inspired to create one of your own! Thanks for visiting and have a fantastic week!!


Tuesday, July 31, 2018

Serendipity Stamps August Blog Hop #1!


Hi all!!


It's August, can you believe it? And you know what that means...fall can't be too far behind! Time to start thinking about making those fall cards! 


I love anything fall-themed. When our local papercrafting store begins carrying fall stamps, I admit I go a little crazy, but collecting fabulous stamps is part of the fun of our hobby, right? 


I have a fall card for you today, but first let me remind you that today is the first day of Serendipity Stamp's first August Blog Hop! Serendipity showcases a new set of stamps every two weeks. Just comment on the Design Team's blogs listed below to enter to win a $20 gift certificate to Serendipity Stamps. The more blogs you comment on, the likelier you are to win!


Here's a list of all the designers participating in the blog hop today...


Keep in mind that the stamp and die of the month are Acorns and Sweetgum and Sympathy, respectively...both are 50% for the month of August! Woo-hoo!

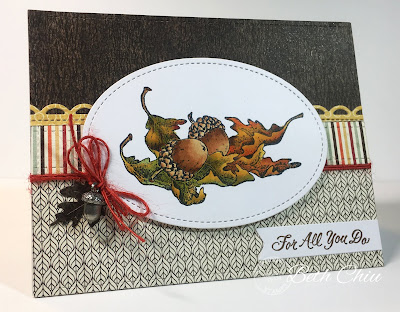
For today's card I used the Acorns stamp...


This stamp is so pretty and so easy to color! I took a fun class last year with the incredibly talented Jenny from One Krafty Cat (http://onekraftykat.blogspot.com/). In the class we learned how to color leaves to make them look realistic. One of the main things I learned was not to worry about blending the colors perfectly...leaves aren't perfect in nature so why should they be in our images?  Here are the Copic markers I used...


 After my image was colored I cut it out using an oval die cut. 

I created the card background using Authentique's 'Harvest' patterned paper collection. I chose several papers to layer and used die cuts to create the horizonal stripes strip and the lacy edge border. I wrapped persimmon-colored twine twice around the card, securing with strong tape. I then popped up my image using foam tape and added it to my background. 


Next, I made a bow using the persimmon twine and an acorn charm from my stash and added it to the card. I also die cut a small leaf from the Leaves Reverse Die and tucked it below my bow. 


At this point I decided to make my card into a fall 'thank you' card. For my sentiment, I stamped For All You Do (small) using Distress Oxide Ink in Walnut Stain. I cut this out using a fishtail banner die and mounted this onto the front of my card.


For the inside, I layered more Authentique patterned papers. I stamped the Thank You II Horizontal using Walnut Stain Distress Oxide ink and added it with another leaf to finish the card.


As always, a big THANK YOU for visiting my blog today...I hope you have a great week!!