Showing posts with label Stardream. Show all posts

Tuesday, March 20, 2018

Serendipity Stamps March Blog Hop #2!

Happy Spring you guys!!

I've gotta tell you...I'm starting to get really excited because Springtime just officially began yesterday! I've been seeing lots of happy Springtime stamp images lately, and the gorgeous lilacs stamp from Serendipity Stamps that I've colored for today's card has to be one of my all-time favorites. Floral stamps are awesome because they can be used for so many different types of cards...thinking of you, birthday, sympathy, Mother's Day or other holiday, etc...pretty much any type of card you'd like to create!

Please note that today is the first day of Serendipity Stamp's second BLOG HOP for the month of March!

Serendipity Stamps showcases a new set of stamps every two weeks. Just comment on the Design  Team's blogs listed below to enter to win a $20 Serendipity Stamps gift certificate.....the more blogs you comment on, the more likely you are to win!

Here's a list of all the designers participating in the blog hop today...please welcome the talented Bonnie Klass who is our guest designer this month! And I apologize for all the different shades of purple fonts...I'm having some strange issues with my program that I just can't seem to get worked out yet!

The lilacs stamp I used for my card this week is the Stamp of the Month for March which means that it will be 50% off until the end of this month!! Yay!! And before I forget....another YAY! There's a SALE going on right now at Serendipity Stamps! Buy any three items and get the fourth one FREE! The sale ends March 24th so be sure and check it out!

Here's my card for today...


I stamped the image onto Copic X-Press It paper using MFT's Extreme Black Ink. I wasn't exactly sure which colors I wanted to use for my image, so I went online and searched different lilac and butterfly images until I found one I liked and tried to mimic that one using my Copic markers. I used blue-violet, violet, and red-violet shades together to attempt to create more dimension and depth in the flowers. I used YG03/17/67 for the leaves, V000/01/04 for the butterfly, and BG0000/000/01 for the area around the image. 

I thought the image looked a bit flat so I decided to add a little bling to the flowers. I used two different types of sequins to do this...one was a regular iridescent sequin and the other was a much smaller circle without the regular sequin's "hole" in the center. It looks pretty when you turn the card back and forth in the light but unfortunately,  I had a hard time getting the camera to capture this.  The following photo may give you a little better idea...it all depends on how the light hits it!


I used purple Stardream cardstock to create a "frame" for my lilacs and used some foam tape between my frame and my lilacs. I then adhered these to the front of an A2 sized card. I also added a little bow made from green jute twine to the front of my card.

I used a Serendipity Stamps sentiment for the inside of my card...it's called Sending Lots of Love. I really love the elegance and the simplicity of this stamp! I stamped it using MFT ink in Grape Jelly which matched my Stardream cardstock perfectly.


That's all for today! As always, thanks for visiting and good luck on the Blog Hop!!


Tuesday, January 16, 2018

Serendipity Stamps January Blog Hop #2!

Hello everyone! Thanks for joining me today for Serendipity Stamp's BLOG HOP!!

Serendipity Stamps showcases a new set of stamps every two weeks. Just comment on the Design  Team's blogs listed below to enter to win a $20 Serendipity Stamps gift certificate.....the more blogs you comment on, the more likely you are to win!

Here's a list of all the designers participating in the blog hop today...


Marybeth Lopez 
Mary's Blog (Serendipity Stamps owner)
 
Julie Warner 
Beth Chiu (that's me!)
Miriam Napier
Vickie Zimmer

Before I share today's card with you, I want to let  you know that the Individual Floral Alphabet Stamps are 50% off until the end of January! They make some really beautiful cards so be sure to check them out!

So I have to tell you...this week just wasn't a very good week for me, creatively speaking. I have no idea why. It just one of those weeks where I wasn't happy with anything I was making. I'm sure you all know what I'm talking about, right? It happens to all of us at some time or another! So I decided I wanted to do something relatively simple for today's card.

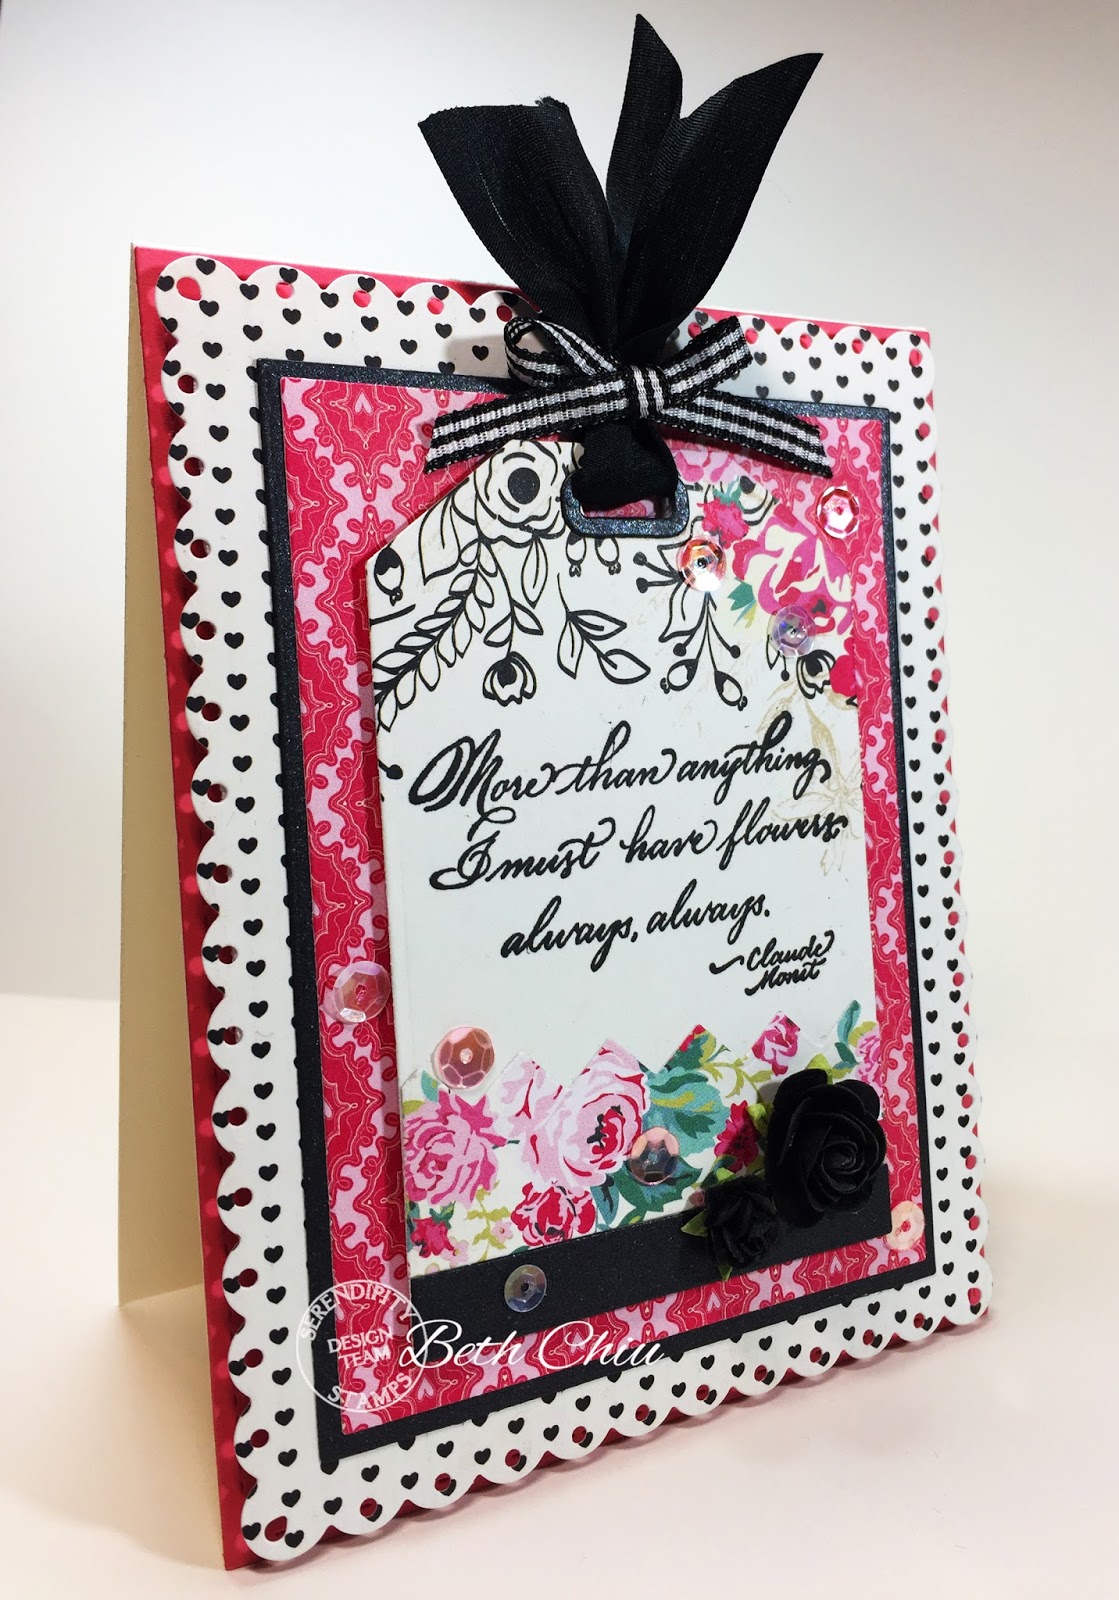
I went through my collection of Serendipity stamps and found this wonderful sentiment stamp with a quote by Claude Monet...it's called More Than Anything. It says "More than anything, I must have flowers always, always". What a fantastic sentiment to sent a friend who loves gardening! And with Spring right around the corner, I'm looking forward to seeing some beautiful flowers again soon!


I went through my stash and found some beautiful floral patterned paper and stamped the sentiment directly onto the paper using Versafine Onyx Black Ink. I then created a tag using a tag die and some leftover scraps of the paper. I used coordinating papers to create the background for my tag. I also used foam some foam rectangles to pop up some of the layers.

These papers have a Valentine's Day feel which is great for February, but any floral paper would do as long as it has some "white space" in which to stamp.

I then decorated my tag using some black silk ribbon, some black and white gingham ribbon, some black paper roses, and some matching sequins. 

As you can see, this card was so easy to create...great for those days when your creative mojo just isn't flowing like you want it to!


Thanks again for visiting my blog today! Good luck on the hop and remember, Spring really is just around the corner!


Wednesday, December 6, 2017

Serendipity Stamps December Blog Hop #1!!


Hello everyone! I hope you all had a fantastic Thanksgiving...can you believe it's only 19 days until Christmas? I've been super busy making holiday cards and I can't wait to share these two with you today. 

Just a reminder.... today is the first day of Serendipity Stamp's first December BLOG HOP!

Serendipity Stamps showcases a new set of stamps every two weeks. Just comment on the Design  Team's blogs listed below to enter to win a $20 Serendipity Stamps gift certificate.....the more blogs you comment on, the more likely you are to win!

Here's a list of all the design team members participating in the hop... 


Today's first card features the adorable Winter Rabbit stamp. 


This is a really versatile stamp that can be used to make either a Christmas card or a Winter card...the detail on this stamp is fabulous!

This image was so much fun to color! Here are the Copic marker colors I used...

Sky - BG0000
Pine Needles - YG61, YG63, and YG67
Holly leaves - YG13, YG93, and YG99
Rabbit - E40, E41, E42, E43, and E44 (and R20 for his tongue and ears)
Holly Berries - R35
Pinecones - E23, E25, and E27
Snow on Tree and ground - C0, C1, and C2
Birch trees - C0, C1, and C2
Tree in background - YG03, YG17, and YG67
Frame Colors - YG63 and BG01

After I finished coloring my image, I added a few dots around the rabbit's nose with a brown Micron 0.45mm pen to add some extra detail. I also added some Nuvo Crystal drops in Red Berry gloss on my holly bushes for a pop of dimension and color.


While the Nuvo drops were drying, I prepared my A2 sized card by cutting a diagonal panel of blue Stardream cardstock. I laid this on top of a green piece of cardstock and cut both out using a stitched rectangle die. I then adhered a sparkly blue ribbon across the diagonal edge using a strip of Scor-Pal tape. I cut out the image using my paper trimmer and mounted it onto my background using foam tape.

I created a fun focal point on the left side of my card using a metal "Winter" charm, some green jute twine, and a tiny white button. 

After the card was finished, I felt that it needed a little extra "something", so I took a white glaze pen and dotted it all over the green cardstock to resemble snow.


For the inside of my card, I stamped a sentiment from Serendipity Stamp's For Unto Us cling stamp set using green ink. (If you haven't taken a look at this set, check it out...it's a set of 6 different holiday stamps for a very reasonable price, and the fonts are gorgeous!) I then mounted my sentiment panel to my card using more blue Stardream cardstock and a dotted green patterned paper. 

My second card was made using Serendipity Stamp's Sled stamp!


I think this is such a beautiful scene. I grew up in the South so snow was a rarity...and if we did get snow it certainly wasn't enough to go sledding! Looking at this stamp made me dream about living up North and jumping on a sled and racing down a hill...it just seems like so much fun!

To create this card, I first stamped the sled image onto Copic X-Press it paper with Memento
Tuxedo Black Ink. I first colored my background sky using Copic BG0000 and BG000. I then colored the rest of the image using the following Copic colors:

Sled - YG93, YG95, and YG97
Wooden building - E41, E42, E43, and E44
Snow shadows - C0, C1, and C2

I also used a bit of  Spectrum Noir Sparkle in clear to add a bit of glitter to the snow.

After I finished coloring the image I decided to create a snowy scene using Copic Opaque White Pigment paint. I've been using it to create lots of snowy scenes on my cards and I absolutely love it! I just put a little bit of it on an acrylic block, thin with water to create a thin liquid, and "spray" it onto my scene by flicking it with a brush or a tooth brush. I think it really helped to make this scene look inviting!


After I finished my scene, I die cut it using a rounded rectangle frame die. I also cut a frame for my scene using this same die and olive green cardstock. 

I created a background for my snowy scene using coordinating patterned papers and a rectangle die with rounded corners. Before I mounted my scene onto my background papers, however, I tied the edge of my scene up with some olive green silk ribbon, some navy blue jute twine, and a metal snowflake accent. I added a glittery green enamel dot on my snowflake for an extra bit of color.

Finally, I popped up my scene using foam tape and adhered it to my background papers. I used desert storm heavyweight cardstock for this A2 sized card.

For the inside of my card, I stamped the Winter Wishes stamp with black ink and colored it in an ombre style using YG93, YG95, YG97, and B32. I added a little white gel pen on the "snow" on top of the letters. I used the same dies and papers on the inside of my card as I did on the outside. 

Thanks so much for spending a little time with me today. I hope you all enjoy this holiday season with your friends and families. Happy Cardmaking! And good luck on the blog hop too!